Adobe ImageReady - Animation Floating Text
Adobe ImageReady - Animation Floating Text
This tutorial is basically for Adobe Imageready, though I start the image editing from Adobe Photoshop only...
I wont be explaining much about how i created the banner or the text... Just few points, and then straight to animation which is the gist here..
Motion/Animation can be achieved by many ways. But one of the nice ways is to use Tweening option... I will be explaining on how to use it and apply it to move a text around the siggi.
Ok, here's a simple background I created for the banner/sig... Opened it in Photoshop
Now put your text on it.. Colors are your choice , i chose #8500b7 (u can type this color code in color selection palette)
right click the text layer, goto the blending options and make following modifications
Now.... ...The most important thing in making animations is visualizing... The results of animation most of the times may vary with your original idea... So u have to visualize at first hand how your animation is going to be...
Like in this example, I want the image to float, bounce off the boundaries... So with that i have thought of the path the text should follow... I am giving the directional path of different set of motions , marked by numbers.. Dont draw the following arrows on your image.. This is just for giving the idea.....
From now on , I will talk about the direction text is moving in by the numbers i have given on the arrow....
The animation's first frame would be starting of "1" and end would be end of "7" .. One point in animation is , the animation is nothing but few frames in a loop.. So we have to make sure that the continuation from last frame to the first frame is seamless.. i.e. animation shouldnt look broken after it loops from "7" to "1".. I will explain how i achieved this later on....
Ok, so now time to goto ImageReady.. Click on the switch over icon in toolbox..
Now you can see a window named "animation".. This has to contain all frames of animation.. with 1 selected, press the little arrow and select other, put the time as 0.08.
Now click on the duplicate frame button at the bottom of animation window
And now the motion.. Make sure that in layer palette, the text layer (or whatever you want to move) is selected..(and make sure whatever u have to move is on different layer than background)...
Now animation window has two frames.. Select them both (by clicking on the first one , Ctrl pressed, with the second frame already selected. If 2nd frame is not selected , Ctrl+click that too)..The basic point is the two frames should be selected
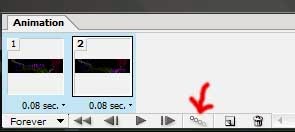
 Now, with both last frames selected , Press the tween button from bottom of anim. window.. Tween stands for "in-between frames".. So we will put 2 tween frames for short distance movement , 1 frame for even shorter distance, and 3 for longer distance.. You'll understand what i m saying from the following figures..
Now ...go to the last frame in the animation window, and press the duplicate frame button again like before.. And move the text layer in the last frame to the end of arrow "2"..Then select the Last Two frames, and press the tween button... We have to follow this step till arrow no. "6", so wont be repeating these sentences...For "7", it is a bit different..
Just will show the screenshots of where I moved to, and how much "tween frames" I entered
"2"
tween frames = 1
"3"
tween frames = 3
"4"
tween frames = 3
"5"
tween frames = 1
"6"
tween frames = 2
Now for "7", remember what I told. The animation is a loop of frames.. So last should end where first should start... i.e. "7" should end where "1" starts...
So go back to the first frame in animation window (frame no. 1) and duplicate it.. Duplicated frame will be numbered - 2 ..drag that frame to the end of the frames in the window, i.e. drag it to make it the last frame..
Now like before. Select the last two frames, press tween
"7"
tween frames = 2
Now delete the the last most frame of the animation, by clicking n selecting it, and then press the delete icon...
Your animation is ready. Test run them by playing the play button..
You can change the timing from 0.08 to anything you want... You can change the tween frame value too, to make animation smoother.... But if you are making your siggi, you have to be particular about the size restriction... So i have used low tween values.. and i have also optimized the save settings.. goto "window--->optimized", and put these settings
and press
Ctrl+Shift+Alt+S to save the gif file....
Hope you learned something from this tutorial..
Adobe ImageReady - Animation Floating Text
 Reviewed by Maher Afrasiab
on
00:33
Rating:
 Reviewed by Maher Afrasiab
on
00:33
Rating:


No comments: